

Icecast is a popular and well loved live audio streaming application. It is free, and requires very limited resources to run. My guide on how to host it for $3.50/month is still very popular. However, it can be confusing to understand how to enable SSL/HTTPS within Icecast.
In this guide, I explain how to enable HTTPS on Icecast, and how to generate SSL certificates for free via Lets Encrypt. In this article, I provide a free Docker container to automate much of the setup of Icecast with SSL.
It’s becoming more and more important to supply your audio via HTTPS. Since Chrome 80 in January 2020, Chrome attempts to automatically upgrade HTTP media requests to HTTPS. If the server doesn’t supply HTTPS media, the request will fail.
There are a few main ways to setup your Icecast streaming server with HTTPS:
- Install Icecast from the Xiph repositories.
- Use AzuraCast, an open source wrapper around Icecast that manages a lot of things (such as SSL) for you.
- Place Nginx in front of Icecast as a SSL terminating proxy.
- Use my new Docker image with in-built Icecast HTTPS/SSL support.
All of these methods require some level of comfort administering a Linux system from the command line. If you are not comfortable with this, please contract one of the many reputable streaming host providers to manage this for you.
Icecast may not be the best method for hosting a large radio station’s stream in 2025 and beyond. Modern streams need IAB-certified statistics to provide to advertisers, ad replacement, pre-roll audio, geo-targeting or geo-blocking, global CDN, and more. Icecast does not provide an easy way to manage this.
Option 1: Installing Icecast via a Docker Image
The original version of this article showed you how to install Icecast manually and configure SSL. This is a bit cumbersome, so I eventually made a Docker image to handle most of this for you. It’s quite easy to install, and can run on virtually any operating system – Linux, Windows and macOS are all options, although a flavour of Linux like Debian or Ubuntu is going to be the most sensible option for cloud hosting.
0. Create your Server
Spin up a new Linux server. I recommend Debian or Ubuntu, but any Linux distribution should be fine.
My personal hosting preference for media server hosting is Digital Ocean and Vultr. Why? These two companies provide reliable services in a variety of locations, with a generous quantity of included bandwidth. They also have excellent support, and easy to use control panels. I explain the server setup process in this article.
1. Installing Docker & the Container
Once you have a blank Linux server, install Docker on your system as per the official instructions. For example, on Debian install as per the Debian Docker install guide.
Login to your server’s terminal, and download and build the container:
git pull https://github.com/MediaRealm/icecast-ssl
cd icecast-ssl
docker build -t icecast-ssl ./ --file Dockerfile
Create a config file and certificate directory and make it writable by nobody. e.g.:
mkdir /home/icecast/config
mkdir /home/icecast/letsencrypt
chown nobody:nogroup -R /home/icecast/config
chown nobody:nogroup -R /home/icecast/letsencrypt
2. Running the Container
Run the container with this command:
docker run -d \
  --name icecast-ssl \
  --mount type=bind,source=/home/icecast/config,target=/config/ \
  --mount type=bind,source=/home/icecast/letsencrypt,target=/etc/letsencrypt/ \
  --log-driver json-file \
  --log-opt max-size=15m \
  --log-opt max-file=5 \
  --restart unless-stopped \
  -p 80:80 \
  -p 443:443 \
  icecast-ssl
3. Configuring the Container and Icecast
At this point, we are almost ready to setup Icecast and generate the SSL certificate. In order for the SSL Certificate validation to work, you will need to have DNS setup and pointing to this server. Configure your subdomain in your DNS Control Panel to point to your new server. Ensure ports 80 & 443 are open on your server’s firewall. I am using the domain ‘stream.example.com’ in this guide – make sure you swap the paths out for your own.
Open a shell into the container:
docker exec -it icecast-ssl /bin/sh
Run the setup script in the container’s shell:
/usr/bin/icecast-setup
You will need to supply these details when prompted by the script:
- Sub-domain name
- Confirm DNS is pointing to this server
- Email for Lets Encrypt
Once it has generated a certificate, it will return these details:
SETUP COMPLETE!
Unless you saw error messages above, you should now be able to use Icecast.
Try connecting to https://icecast.example.com/
If your local DNS cache hasn't updated yet, please try again in an hour. Otherwise, try connecting from another network (e.g. celular)

PASSWORDS:
Please store these passwords somewhere safe NOW.
Source Password (Use this to connect your Encoder): <AUTO GENERATED PASSWORD GOES HERE>

Admin Username: admin
Admin Password: <AUTO GENERATED PASSWORD GOES HERE>

Goodbye!
If there are errors in the setup process, you can re-run the script.
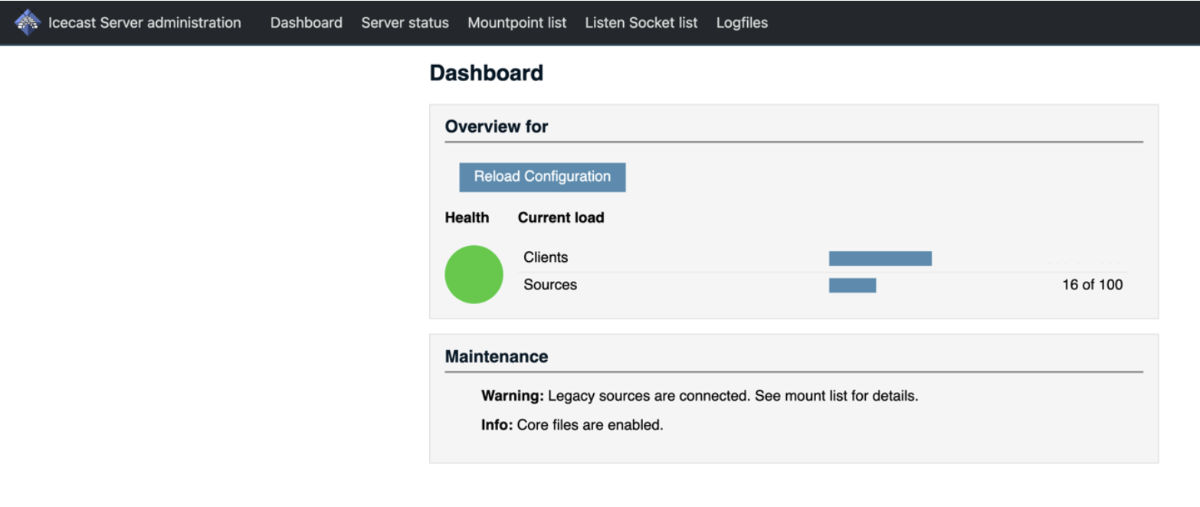
Check the server is running by browsing to https://stream.example.com/admin and logging in as the ‘admin’ user (the password is shown in the previous step).
Further Configuration & Maintenance
Hope Media Stream2.CNMNS.net Server Documentation 20250915
All configuration is in a single XML file. This can be edited via the Linux CLI using an editor such as Nano:
/home/icecast/config/icecast.xml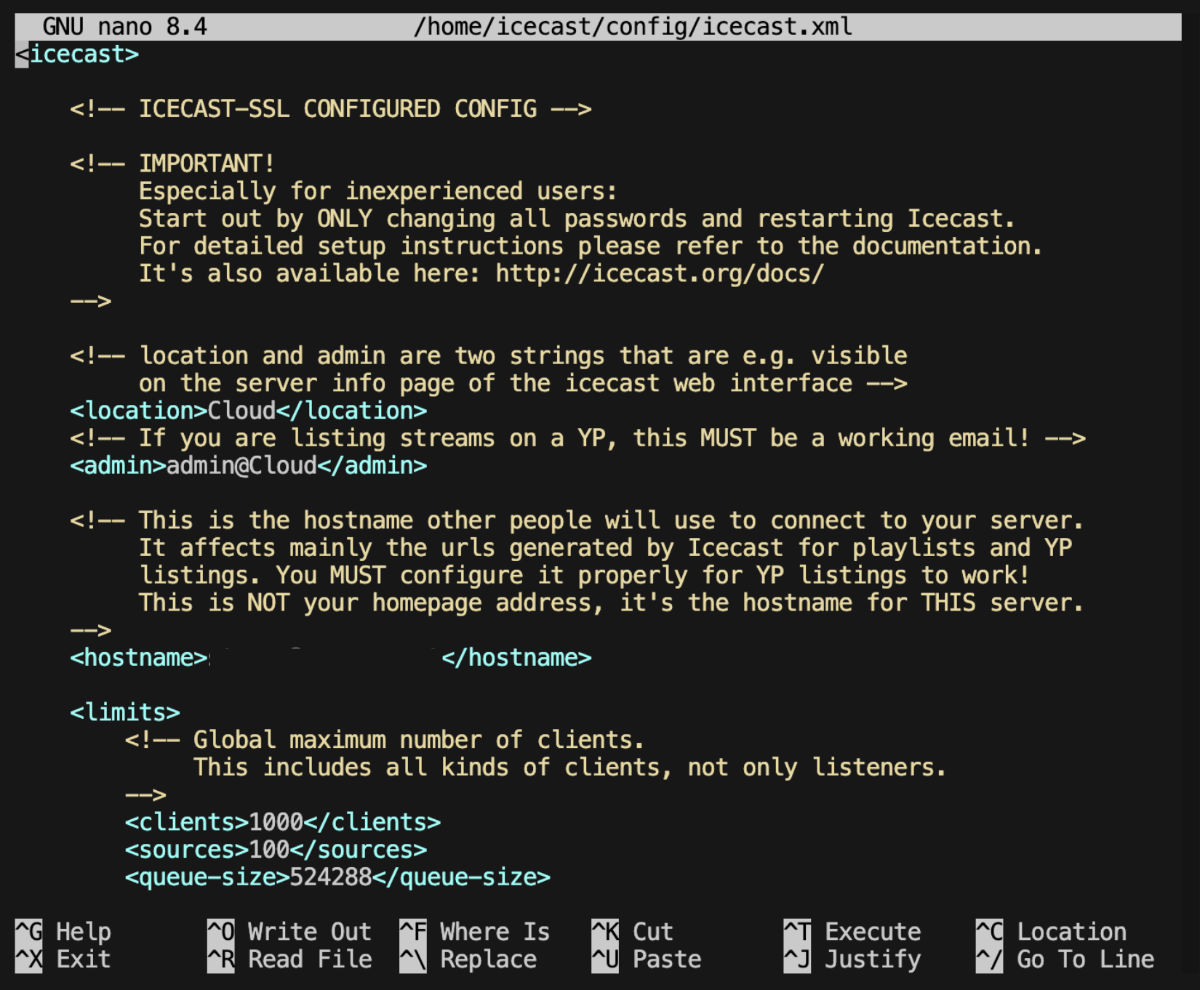
Once the file has been saved, you can click the ‘Reload Configuration’ button in the admin dashboard.
To restart the container at any time (such as to force a reload of the configuration file):
docker container stop icecast-ssl && docker container start icecast-sslTo view the logs from your container:
docker logs -n 100 icecast-sslBackups
Ensure you keep a backup of your icecast.xml file somewhere safe, such as your own cloud storage or other backup location. In the event your server needs to be rebuilt, you can load this icecast.xml file onto the new server.
Option 2: Installing Icecast with HTTPS Support
If you do not wish to use my Docker container, you can install using this older method.
Ubuntu/Debian do not supply a version of Icecast with HTTPS support enabled (due to some licensing issues), but Xiph (the foundation behind Icecast) supplies repositories with a pre-built version of Icecast with SSL support. Even if you already have the Debian/Ubuntu packages of Icecast already installed on your system, it’s easy to upgrade using the same process detailed below.
This section of the guide guide assumes you’re running Ubuntu 18.04 or newer. Older versions may work, but there’s a lot of painful stuffing around with package dependencies.
On your server, add the Xiph package repository to your apt source list:
sudo sh -c "echo deb http://download.opensuse.org/repositories/multimedia:/xiph/xUbuntu_18.10/ ./ >>/etc/apt/sources.list.d/icecast.list"Download the signing key and add it to apt:
wget -qO - http://icecast.org/multimedia-obs.key | sudo apt-key add -Note: at the time of writing in 2020, the key supplied in the above command has expired. You can instead use this command to download the the newer one from OpenSUSE directly:
wget -qO - https://build.opensuse.org/projects/multimedia:libs/public_key | sudo apt-key add -Update the packages cache:
apt-get updateNow, you can install or update Icecast:
apt-get install icecast2At this point, you may need to configure Icecast. If this is a new installation, jump over to my setup guide for detailed instructions. If this is an existing installation, Icecast should still be running with your existing configuration. Make sure you test this now.
Installing and running Lets Encrypt Certbot for Icecast
Now, we can begin to install and run the tools needed to generate an SSL certificate. This section assumes your server can be located at ‘stream.example.com’.
In order for the SSL Certificate validation to work, you will need to have DNS setup and pointing to this server. Icecast must already be running on Port 80. I am using the domain ‘stream.example.com’ in this guide – make sure you swap the paths out for your own.u
apt-get install certbotRun certbot with the correct domain for your server:
certbot certonly --webroot-path="/usr/share/icecast2/web" -d 'stream.example.com'When prompted, select the ‘webroot’ option and input your email address. Your certificate should be generated at this point. If you receive errors, take note of them and start doing some research online. The most common error is the inability to validate – in this case, make sure Icecast is accessible via DNS on Port 80, and check your webfoot is indeed ‘/usr/share/icecast2/web’.
We now need to concatenate two certificate files so they are in the correct format for Icecast to use:
cat /etc/letsencrypt/live/stream.example.com/fullchain.pem /etc/letsencrypt/live/stream1.example.com/privkey.pem > /etc/icecast2/bundle.pem

chmod 666 /etc/icecast2/bundle.pem
If you know which user Icecast is running under, you can run a chown instead of a chmod. Icecast needs to be able to read this new PEM file – that’s the goal here.
While we’re thinking about it, we should also make sure certificate renewals run correctly. Open the certificate config file in a text editor:
nano /etc/letsencrypt/renewal/stream.example.com.confAdd this line to the [renewalparams] section:
post_hook = cat /etc/letsencrypt/live/stream.example.com/fullchain.pem /etc/letsencrypt/live/stream.example/privkey.pem > /etc/icecast2/bundle.pem && service icecast2 restartYou can validate the renewal process to make sure it works correctly:
certbot renew --dry-runConfigure Icecast for SSL
We are now ready to finish this off and get Icecast running with our new certificate.
Edit Icecast.xml in a text editor:
nano /etc/icecast2/icecast.xmlAdd this line to the <paths></paths> section:
<ssl-certificate>/etc/icecast2/bundle.pem</ssl-certificate>Now, add this section to the document (in the root XML node):
<listen-socket>
    <port>443</port>
    <ssl>1</ssl>
</listen-socket>
Quit the text editor, and now restart Icecast:
sudo service icecast2 restartIf all goes well, you can now browse to httsp://stream.example.com/ and also listen to your internet streams over HTTPS.
Optional: DNS Validation
If you operate a round-robin configuration of Icecast, you may prefer to use DNS certificate validation instead of HTTP validation. This will allow every server to get a certificate for the one domain.
To do this, you need to install a DNS plugin for your provider. Suported providers include AWS Route53 and others.
Installation of the Route53 plugin on your server is easy:
apt-get install python3-certbot-dns-route53You will need to create a new user in IAM with permissions on your DNS zone. This is done via the AWS IAM Console. Here is an example policy:
{
     "Version": "2012-10-17",
     "Statement": [
         {
             "Sid": "VisualEditor0",
             "Effect": "Allow",
             "Action": [
                 "route53:ListHostedZones",
                 "route53:GetChange"
             ],
             "Resource": "*"
         },
         {
             "Sid": "VisualEditor1",
             "Effect": "Allow",
             "Action": [
                 "route53:GetHostedZone",
                 "route53:ChangeResourceRecordSets",
                 "route53:ListResourceRecordSets"
             ],
             "Resource": "arn:aws:route53:::hostedzone/ABCDEF"
         }
     ]
 }
You will need to install the AWS CLI on your server. When prompted, insert the AWS IAM credentials provided to you via the AWS Console.
curl "https://d1vvhvl2y92vvt.cloudfront.net/awscli-exe-linux-x86_64.zip" -o "awscliv2.zip" unzip awscliv2.zip ./aws/install aws configure
When initially requesting the certificate via certbot, your command would look like this:
certbot certonly
   --dns-route53
   -d 'stream.example.com'
Originally Posted: 14 February 2020